21 Jan Steps to Configure Yandex Mail account as IMAP in Outlook
- Launch the Microsoft Outlook application in your desktop.
- Navigate to Tools » Account Settings » Email Accounts » Email >> New
- Select ‘Manually configure Server settings or Additional Server Types’ » Click Next
- In ‘Choose Email Service’ page, select Internet mail, click ‘Next’.
- In Add New Email Account page, type the following details.
- User Information
- Your Name – Preferred Display Name
- E-mail Address – Provide Yandex Email Address – [email protected] if you have your domain hosted with Yandex.
- Server InformationYandex.Mail IMAP Settings (Incoming Mail):IMAP server: imap.yandex.com
Port: 993
TLS/SSL: Yes
Username: (your full Yandex.Mail email address)
Password: (your Yandex.Mail password)Yandex.Mail SMTP Settings (Outgoing Mail)SMTP server: smtp.yandex.com
Port: 465
TLS/SSL: Yes
SMTP authentication: Yes
Username: (your full Yandex.Mail email address)
Password: (your Yandex.Mail password) - Logon Information
- User name – The email address of your zoho account ([email protected] for Email Hosting users / [email protected] for personal users).
- Password – Yandex Account Password
- Select ‘Remember Password’
- Click on ‘More Settings’,
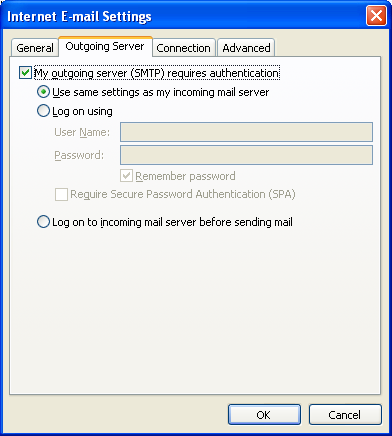
- In the popup that appears, click on Outgoing Server
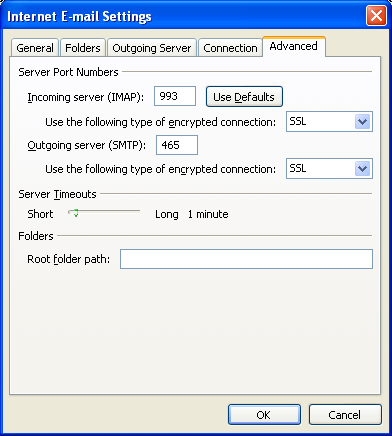
- Select the tab ‘Advanced’
- Incoming Server (IMAP): 993
- Select ‘This server requires an encrypted connection (SSL)’
- Outgoing Server (SMTP): 465
- Select ‘SSL’ from the drop down for encrypted connection
- Delivery Section
- Select ‘Leave a copy of messages on the server ‘ if you need it in YANDEX.MAIL also.
- Click ‘Ok’. You will be back to ‘Add New Email Account’ dialog.
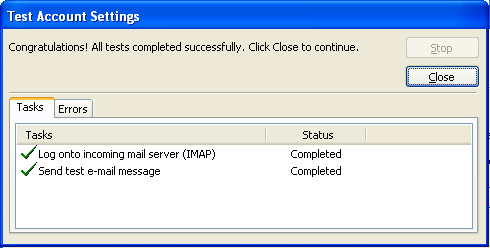
- Click ‘Test Account Settings’. Outlook will test the settings by sending a Test mail.
- When the tests are successful, Outlook displays a popup as shown.
- Click Close
- In the ‘Add Email Accounts’ Window, click Next.
- Outlook will display a message for successful completion of Wizard.
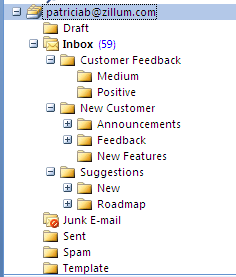
- The folder structure in your Yandex Mail account will be replicated here.


No Comments